
| 일 | 월 | 화 | 수 | 목 | 금 | 토 |
|---|---|---|---|---|---|---|
| 1 | 2 | 3 | ||||
| 4 | 5 | 6 | 7 | 8 | 9 | 10 |
| 11 | 12 | 13 | 14 | 15 | 16 | 17 |
| 18 | 19 | 20 | 21 | 22 | 23 | 24 |
| 25 | 26 | 27 | 28 | 29 | 30 | 31 |
- CustomScrollView
- Compose
- DART
- tabbar
- 앱바
- Coroutines
- textview
- Dialog
- textfield
- 테스트
- android
- livedata
- 앱
- Flutter
- drift
- intent
- Kotlin
- 안드로이드
- TEST
- activity
- viewmodel
- 계측
- data
- Button
- ScrollView
- LifeCycle
- appbar
- scroll
- Navigation
- binding
- Today
- Total
Study Record
[안드로이드] EditText 살펴보기 본문
😶 EditText
EditText 는 TextView 를 상속받고 있는 사용자의 입력을 받을 수 있는 View 이다.
기본적으로 TextView 를 상속받고 있어 텍스트 관련 스타일을 textSize, textColor, textStyle 등으로 지정할 수 있다.
😶 힌트가 설정된 경우
android:hint , android:textColorHint 속성으로 사용자에게 입력받기 전 힌트 텍스트를 보여줄 수 있다. android:hint 는 힌트 텍스트를, android:textColorHint 는 힌트 텍스트 색상을 결정한다.

<EditText
    android:layout_width="match_parent"
    android:layout_height="wrap_content"
    android:padding="20dp"
    android:hint="이름을 입력해주세요."
    android:textSize="18sp"
    android:textColor="@color/black"
    android:textColorHint="@color/gray"
    android:background="#FFFFdFdF"/>
😶 배경 설정
editText 의 배경은 android:background 속성으로 설정할 수 있다. 값이 "@null" 일 경우 배경이 없고, "#FF4f4f4f" 같이 단일 색상으로 설정하거나 "@drawable/edit_box" 와 같이 xml 파일로 설정할 수 있다.
xml 배경 파일 예시)

<?xml version="1.0" encoding="utf-8"?>
<selector xmlns:android="http://schemas.android.com/apk/res/android">
    <item android:id="@android:id/background">
        <shape android:shape="rectangle">
            <solid android:color="#00FFFFFF"/>
            <stroke android:color="@color/gray"
                android:width="1dp"/>
            <corners android:radius="10dp"/>
        </shape>
    </item>
</selector>
😶 입력 유형 설정
android:inputType 속성으로 키보드에서 입력받을 데이터에 제한을 둘 수 있다. 몇개의 속성을 설명하자면 다음과 같다.
| android:inputType 속성 값 | 설명 |
| textPassword | 패스워드 형식으로 사용자의 입력값이 점으로 보인다. |
| text | 텍스트 형식이다. (1줄, 가로 무한 스크롤 형식) |
| phone | 숫자만 입력할 수 있다. |
| textMultiLine | 여러 줄의 텍스트를 입력할 수 있다. |
예시 ) textPassword 형식

<EditText
    android:layout_width="match_parent"
    android:layout_height="wrap_content"
    android:inputType="textPassword"
    android:padding="20dp"
    android:textSize="18sp"
    android:textColor="@color/black"
    android:background="@drawable/box_stroke_black"/>
😶 이벤트 설정하기
텍스트 변경 상시 감지 (TextWatcher)
EditText 에서 텍스트의 변경을 모니터링하고 있다가 변경을 감지하면 콜백 하게 할 수 있다.
editView.addTextChangedListener(object : TextWatcher {
    override fun beforeTextChanged(s: CharSequence?, start: Int, count: Int, after: Int) {
        // 텍스트가 변경되기 전 새 텍스트(s)로 변경될 예정임을 알리기 위해 호출됨
    }

    override fun onTextChanged(s: CharSequence?, start: Int, before: Int, count: Int) {
        // 텍스트가 변경됐을 경우 호출
    }

    override fun afterTextChanged(s: Editable?) {
        // 텍스트가 변경된 후 호출
    }
})
단일 키 이벤트 처리
setOnKeyListener 사용하면 단일 키 이벤트를 처리할 수 있다.
nickEditView.setOnKeyListener { v, keyCode, event ->
    if(event.action == KeyEvent.ACTION_DOWN) {
        if(keyCode == KeyEvent.KEYCODE_ENTER) {
            Log.d("KEY_EVENT", "Enter 입력")
        }
    }
    false
}
😶 입력 방법 지정하기(imeOptions)
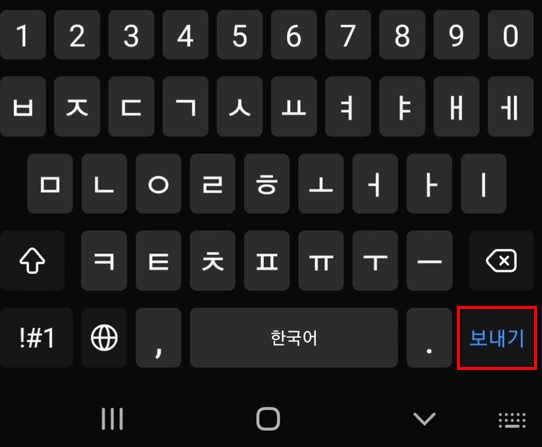
키보드 작업 버튼의 내용을 지정하려면 android:imeOptions 속성을 이용하면 된다. 그 중 속성 값 중 actionDone 로 설정하면 "완료" , actionNext 로 설정하면 "다음" actionSend 로 설정하면 "보내기" 로 표시된다. 이 외에도 여려가지 속성값이 있다.
<EditText
    android:id="@+id/edit_text"
    android:inputType="text"
    android:imeOptions="actionSend"
    android:layout_width="150dp"
    android:layout_height="wrap_content"
    app:layout_constraintTop_toTopOf="parent"
    app:layout_constraintBottom_toBottomOf="parent"
    app:layout_constraintStart_toStartOf="parent"/>
키보드 작업 버튼을 눌렀을 때의 이벤트를 설정하고 싶다면 setOnEditorActionListener 을 설정하면 된다. xml 파일의 android:imeOptions 를 설정한 값에 따라 분기해준다. return 값이 true 이면 키보드가 내려가지 않고 false 이면 키보드가 내려간다.
binding.editText.setOnEditorActionListener { v, actionId, event ->
    return@setOnEditorActionListener when(actionId) {
        EditorInfo.IME_ACTION_SEND -> {
            Toast.makeText(this, "ACTION_SEND", Toast.LENGTH_SHORT).show()
            true
        }
        else -> false
    }
}
입력 방법 유형 지정 | Android 개발자 | Android Developers
입력 방법 유형 지정 컬렉션을 사용해 정리하기 내 환경설정을 기준으로 콘텐츠를 저장하고 분류하세요. 모든 텍스트 필드에는 이메일 주소, 전화번호 또는 일반 텍스트와 같은 특정 유형의 텍
developer.android.com
'안드로이드' 카테고리의 다른 글
| [안드로이드] ConstraintLayout 살펴보기 (0) | 2023.06.17 |
|---|---|
| [안드로이드] 키보드 내리기/올리기/Activity 시작 시 자동으로 올리기 (0) | 2023.06.16 |
| [안드로이드] style 과 theme (0) | 2023.06.15 |
| [안드로이드] ScrollView 살펴보기 (+ NestedScrollView) (0) | 2023.06.15 |
| [안드로이드] LinearLayout 살펴보기 (0) | 2023.06.15 |
