
| 일 | 월 | 화 | 수 | 목 | 금 | 토 |
|---|---|---|---|---|---|---|
| 1 | 2 | 3 | 4 | 5 | 6 | 7 |
| 8 | 9 | 10 | 11 | 12 | 13 | 14 |
| 15 | 16 | 17 | 18 | 19 | 20 | 21 |
| 22 | 23 | 24 | 25 | 26 | 27 | 28 |
- data
- ScrollView
- android
- Dialog
- 계측
- DART
- drift
- scroll
- TEST
- Flutter
- Navigation
- 안드로이드
- 테스트
- activity
- binding
- viewmodel
- tabbar
- CustomScrollView
- Compose
- 앱
- intent
- Kotlin
- Coroutines
- livedata
- appbar
- LifeCycle
- textfield
- textview
- 앱바
- Button
- Today
- Total
Study Record
[Flutter] ReorderableListView 본문
✍ ReorderableListView
리스트 뷰의 항목의 순서를 사용자가 바꿀 수 있는 위젯으로 긴 터치(Long touch)를 한 상태에서 드래그를 하면 위젯이 따라온다. 원하는 위치에 터치 상태에서 손을 떼면 그 위치로 위젯의 순서가 바뀐다.
😶 ReorderableListView
ReorderableListView() 로 생성하면 children 에 항목(하위 위젯)을 넣는데 한 번 생성될 때 전부 한꺼번에 생성되기 때문에 비용이 많이 든다. 리스트 항목의 순서를 바꾸는 모션은 ReorderableListView 가 자동으로 해주지만 그 값을 바꾸는 것은 직접 해야 한다. onReorder 인자로 사용자가 직접 순서를 바꾼 위젯의 index(oldIndex, newIndex)를 받을 수 있는데 바꾸기 전 index 와 순서를 바꾼 후의 index 를 제공해 준다. 이 정보들로 값을 직접 바꿔 setState() 로 한 번 build() 함수를 다시 호출한다. (따라서 ReorderableListView 는 statefulWidget 이어야 한다.) 또한, 항목에는 반드시 key 값이 필요하다!!
List<int> numbers = List.generate(100, (index) => index);

ReorderableListView(
  onReorder: (int oldIndex, int newIndex) {
    // oldIndex : 순서를 바꾸기 전 index
    // newIndex : 순서를 바꾼 index
    setState(() {
      if (oldIndex < newIndex) {
        newIndex -= 1;
      }
      final item = numbers.removeAt(oldIndex);
      numbers.insert(newIndex, item);
    });
  },
  children: number
  .map(
    (e) => Container(
      key: Key(e.toString()),
      height: 100.0,
      color: Colors.white,
      child: Center(child: Text("$e")),
    ),
  ).toList(),
);
onReorder 에서 oldIndex 와 newIndex 에 정확히 어떤 값이 들어오는지 확인해 볼 필요가 있다. 만약 [a, b, c, d] 의 순서대로 리스트 항목이 있으면 oldIndex < newIndex 인 경우와 oldIndex > newIndex 인 경우를 비교하면 다음과 같다.
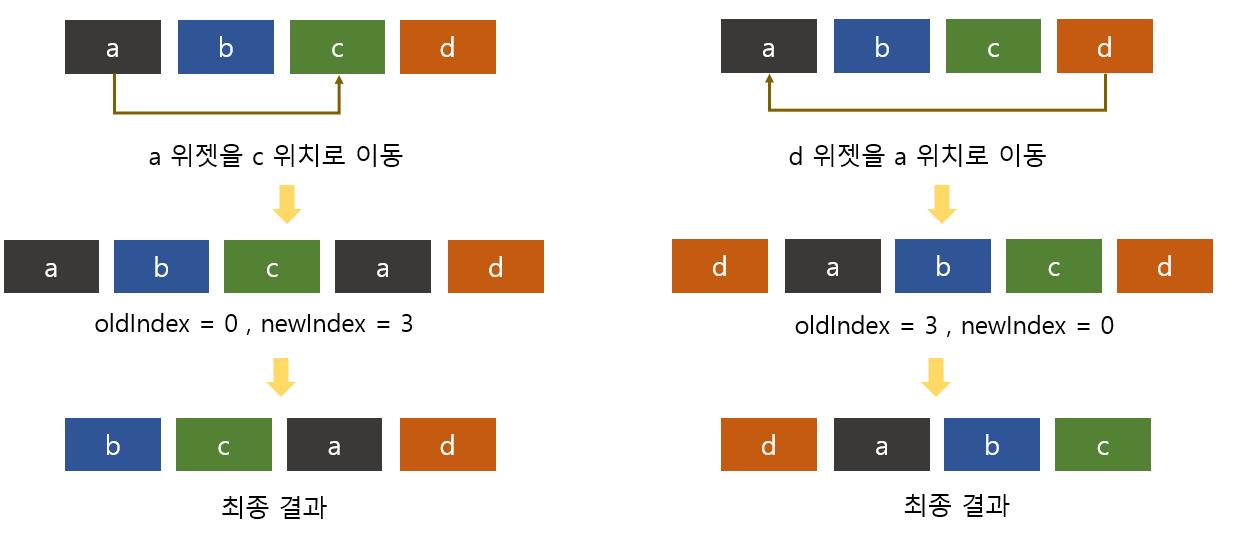
oldIndex < newIndex 인 경우(왼쪽) 최종 결과의 a 위젯의 index 는 2 이지만 newIndex 는 3 이다.
oldIndex > newIndex 인 경우(오른쪽) 최종 결과 d 위젯의 index 는 0 이고 newIndex 는 0 이다.
따라서, oldIndex < newIndex 인 경우 사용자가 순서를 바꾼 위젯의 최종 index = newIndex - 1 로 해줘야 한다. 이 점을 고려하여 위의 예시에도 onReorder 에서 oldIndex < newIndex 일 경우 순서가 바뀐 위젯을 삽입할 때 newIndex - 1 위치로 한다.
😶 ReorderableListView.builder
ReorderableListView() 로 생성하는 것과 원리는 동일하며, itemCount 로 항목의 개수를 정하고 itemBuilder 로 리스트 항목을 각각 리턴 받는 것이 다르다. 또한, 한 번에 itemCount 개수만큼 항목이 생성되는 것이 아니라 화면에 보이는 항목을 기준으로 몇 개씩만 보인다. 스크롤을 하면 이전 항목은 지워지고 화면에 보이는 항목을 기준으로 몇 개의 항목이 생성된다.
ReorderableListView.builder(
  itemCount: 15,
  onReorder: (int oldIndex, int newIndex) {
    setState(() {
      if (oldIndex < newIndex) {
        newIndex -= 1;
      }
      final item = numbers.removeAt(oldIndex);
      numbers.insert(newIndex, item);
    });
  },
  itemBuilder: (BuildContext context, int index) {
    return  Container(
      key: Key(index.toString()),
      height: 100.0,
      color: Colors.white,
      child: Center(child: Text("$index")),
    );
  },
);
✍ ReorderableListView parameter
위에서 생성 방법에서 모두 적용할 수 있는 다른 파라미터에 대해 소개하자면 다음과 같다.
😶 header, footer
header 는 리스트 항목의 맨 처음 위젯을, footer 는 리스트 항목의 맨 마지막 위젯을 따로 설정할 수 있다. 만약, itemCount 혹은 children 리스트의 길이가 '5'라면 header 와 footer 까지 '7'개의 항목을 가진다.
예시)

ReorderableListView.builder(
  itemCount: 2,
  header: Container(height: 50, color: Colors.green, child: Center(child: Text("header"))),
  footer: Container(height: 50, color: Colors.indigo[100], child: Center(child: Text("footer"))),
  onReorder: (int oldIndex, int newIndex) {
    setState(() {
      if (oldIndex < newIndex) {
        newIndex -= 1;
      }
      final item = numbers.removeAt(oldIndex);
      numbers.insert(newIndex, item);
    });
  },
  itemBuilder: (BuildContext context, int index) {
    return  Container(
      key: Key(index.toString()),
      height: 100.0,
      color: Colors.white,
      child: Center(child: Text("$index")),
    );
  },
);
😶 가로 스크롤 vs 세로 스크롤(default)
scrollDirection 인자로 세로 스크롤(Axis.vertical), 가로 스크롤(Axis.horizontal)을 정할 수 있다. 세로 스크롤일 때는 세로와 관련된 위젯(ex. Column) 가로 스크롤일 때는 가로와 관련된 위젯(ex. Row)을 사용해야 한다. 기본 값은 Axis.vertical 이다.
ReorderableListView(
  scrollDirection: Axis.horizontal,
  scrollDirection: Axis.vertical,
  ...
);
😶 키보드 컨트롤
keyboardDismissBehavior 인자를 사용하면 SingleChildScrollView 에 TextField 와 같이 입력 폼이 포함될 때, 사용자가 TextField 를 클릭 시 키보드가 올라왔을 때 스크롤 시 키보드가 자동으로 내려갈지(manual) 아니면 온전히 사용자에 맡길지(스크롤 시 자동으로 키보드가 내려가지 않음, onDrag) 정할 수 있다.
ReorderableListView(
  keyboardDismissBehavior: ScrollViewKeyboardDismissBehavior.manual,
  keyboardDismissBehavior: ScrollViewKeyboardDismissBehavior.onDrag,
  ...
);
😶 스크롤 모양
physics 인자를 사용하면 스크롤 모양을 설정할 수 있다.
| 인자(physics) | 설명 |
| NeverScrollableScrollPhysics | 사용자가 스크롤 불가능하다. |
| AlwaysScrollableScrollPhysics | 항상 사용자가 스크롤을 가능하게 하고 스크롤 모양은 기종 기본값을 따른다. |
| BouncingScrollPhysics | IOS 기본 스크롤 모양으로, 튕기는 모양이다. |
| ClampingScrollPhysics | AOS 기본 스크롤 모양이다. |
| PageScrollPhysics | 페이지 단위로 스크롤할 수 있다. |
ReorderableListView(
  physics: AlwaysScrollableScrollPhysics(),
  ...
);
+ BouncingScrollPhysics 가 적용된 상태에서 위젯이 화면 크기보다 작을 때 스크롤 시 잘려 보일 수 있다. clipBehavior 를 Clip.none 로 하면 위젯이 잘리지 않으면서 튕기는 스크롤 모양이 된다.
ReorderableListView(
  physics: AlwaysScrollableScrollPhysics(),
  clipBehavior: Clip.none,
  ...
);
'Flutter > widget_scrollView' 카테고리의 다른 글
| [Flutter] CustomScrollView 에서 앱바 컨트롤하기(숨김, 고정 등) - SliverAppBar (0) | 2023.03.08 |
|---|---|
| [Flutter] CustomScrollView (0) | 2023.03.08 |
| [Flutter] GridView (0) | 2023.03.08 |
| [Flutter] ListView (0) | 2023.03.07 |
| [Flutter] SingleChildScrollView(기본 스크롤) (0) | 2023.03.07 |


